
General Details
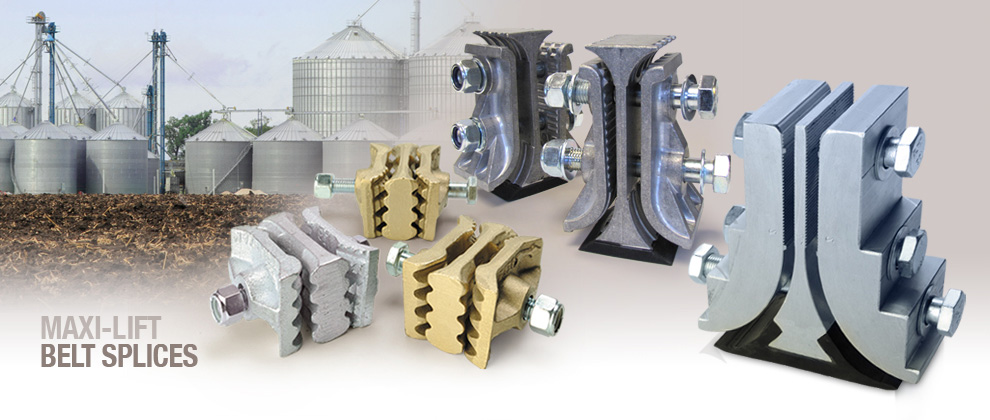
Introducing the new MAXI-SPLICE SUPER. Designed for your demanding elevator belt applications, the MAXI-SPLICE SUPER has several enhancements that make it perfect for use with elevator belts rated at 800 – 1200 PIW. The unique design embraces our existing MAXI-SPLICE three piece construction, and clamps together using grade 5 bolts. The SUPER is constructed using a central vice-grip section bracketed by two exterior solid clamps. Utilizing clamping force and friction to secure the load. The addition of the NBR rubber wedge protects belts for long life.
Features&Benefits
- High Grade Aluminum Construction for Less Hanging Weight
- 800 to 1200 PIW Belts
- NBR Rubber Wedge Protects the Backside of Belt
- Larger Radius for Belt Protection
- Wider Surface Area (3” width) to Grip Belting and Provide Superior Holding Strength
- Non-Sparking / Corrosion Resistant
- Two Bolt Construction for Stronger Grip
- Off the Shelf for Quick Delivery
- Easy to Install
Application
- High Capacity Elevators
- Export Facilities
- Processing Plants
- River Terminals
- Wide Bucket Elevators
- Multiple Row Bucket Elevators
Technical Info

Each Splice accommodates 3” of belt width
Grade 5 Bolts – 3/4” Diameter
Rubberized wedge section is oil resistant, suitable for use up to 176° F / 80° C (Use aluminum wedge for higher temperatures)
Use Super template tape and Power Punch to install (Torque 150 ft. / lbs.)
Weight: 4.8 lbs.
Length: 6-3/4 in.
Width: 3 in.
*Patent Pending
INSTALLATION

- First, ensure that belt ends are square and even. If using the template tape, you must first divide the belt width by 3, and apply the tape to the left belt edge as follows:
A. Use the line marked “LEFT BELT EDGE” (if evenly divided by 3)
B. Use the line marked “LEFT BELT EDGE” (if divided by 3 with .333 remainder)
C. Use the line marked “LEFT BELT EDGE “(if divided by 3 with .666 remainder)
Make sure the template tape is applied squarely to the belt. - Use the Super Punch, or other boring tool to cut holes in the belt at the marked positions. These holes must accommodate 3/4” diameter bolts.
- Pull the ends of the belt together, square up and clamp in place. Use the already punched holes as a guide to punch the other belt end.
- Prepare the center section of each splice by installing the rubber wedge, and any required shims per below.
A. Up to 1/2” thick belting, mount the rubber wedge, without shims, directly to the aluminum center section.
B. 1/2” thick to 5/8” thick, insert one shim between the rubber wedge and the center section.
C. 5/8” thick to 3/4” thick, insert both shims between the rubber wedge and the center section. - Secure the Wedge/shim assembly using the supplied allen key screws and allen wrench. If reusing the screws, you must apply a new coating of thread lock.
- Insert the center Super Splice wedge between the two belt ends, aligning with the drilled holes. The center wedge should be placed so the rubber wedge is toward the pulley side. Place one of the two outer plates on the belt top, and align with the holes drilled in the belt. The large radius end should be toward the pulley side of the belt. Apply one of the washers to the longer of the two bolts and insert the bolt through the hole at the pulley end, then place the shorter bolt with washer in the hole at the belt tail. The bolt head should be up towards the upward side of the elevator to protect the threads from wear during filling.
- Once the bolts are through the belting, apply the bottom plate and apply the flat washer and thread on the nylon insert nut. Tighten until lightly snug. You will want the splices relatively loose at this point so they may be squared with one another before final tightening. Due to the thickness and stiffness of thicker belting, it may be necessary to use clamps to pull the splice together to allow the nut to be applied.
- Repeat this process until all units are in place.
- While still loosely fastened, make sure all of the Super Splice units are square and properly lined up. Use the 1/2” impact wrench to snug all of the bolts to 50 foot pounds, beginning with the outside splice on each side. Now go to the center splice, tighten, and then alternate from left to right until all units are tightened. Tighten the longer bolt first in each unit, then tighten the second bolt. Both bolts should be tightened to a final torque of 150 foot pounds.
- Once the unit is fully tightened, release the clamps and allow the belt to pull into its natural position. Operate the elevator empty for 30 minutes and recheck the torque.
- Operate the elevator under load, and recheck again.
Comments